|
|
Post by mikerobel on Jan 24, 2021 13:52:10 GMT -6
As I mentioned above, I bollixed up by conflating the first decision point with two others, which while partially illuminating, confuses the analysis. So I have gone back and reanalyzed my list, resulting in this post. I think this will be the interesting part, determining where Decision Points are, who made them, what courses of action were available, and conducting an analysis of which way to go,remembering of course, we have much more knowledge than the protagonists. Whether they considered decision points in the same way is relatively unimportant. Each person decides things in a certain way. Some go by a "gut instinct" and others are more methodical. The depth of the analysis is somewhat dependent upon time and whether the decider has considered alternatives before actually setting out on the operation. Today, a decision point (DP) is indicated on a map overlay as a numbered star. It marks a place where the decider has to make a decision between known alternatives. In some cases, it is placed so that effects occur at a designated position when or shortly before the unit arrives at a specified location. For example, I wanted my artillery observer to fire preparation fires so that the last rounds of the prep would be fired just as we thought we would roll up onto the objective, so the enemy's head is still down and so we could be on the objective and dismount before the enemy recovered. I was willing to take the risk of some casualties due to our prep in the hope they would be lighter than if we had to fight our way onto the objective. I have identified 18 Decision Points listed below and they are based on timelines in The Strategy of Defeat, by Fred Wagner. . I would like others to examine them and propose any others. I am not trying to find every DP, just major ones, thus not ever troop commander's decision will be analyzed. If someone has been to the sight and has grid coordinates, I would be grateful for those. I can infer them, but would welcome on the scene input. Tables on the website are tedious to input, so I have added it as an attachment. As we discuss them, each one will be displayed as it is in the attachment. If there is an easier way to insert them, I'd like to know because it is bothersome to have to download the thing to read it and discuss it in detail. Attachments:Decision Points.docx (17.74 KB)
|
|
|
|
Post by AZ Ranger on Jan 24, 2021 16:24:59 GMT -6
Mike
I am amazed at what you have put up here. I go to the battlefield every June since 2010 for several weeks. This year not one showed up except me. So I took advantage of meeting with all the friends I have made over the years. I spent 3 hours with Tall Bull, who lives on the Rosebud near the Davis Creek junction. We talked about everything except the battle. I realized how selfish we are, only wanted particular information. It was one of my best experiences.
So without all the details, you have done, I believe Custer should have stayed on the Rosebud rather than following the trail. He could have sent his scouts up the Rosebud and discovered new information. I believe that information could be used not to continue up the Rosebud.
As far as sending someone up Tullocks, I don't see how Custer can not comply with that part of the order.
I have driven up Davis Creek road many times. My friend works at the Busby Post Office and lives on a ranch with one of the Crow's Nest sites.
What do you need for the location on the Rosebud?
Regards
Steve
|
|
|
|
Post by mikerobel on Jan 25, 2021 11:30:15 GMT -6
Thank you for your very kind words Steve, especially from someone who has spent a lot of time at the Battlefield. I will be fortunate to spend a week at the battlefield and it will likely be a one time thing so I am conducting extensive research and map reconnaissance to prepare sa well as devouring online videos showing the terrain. I am getting good enough so I can identify some on sight.
I am specifically looking for grid coordinates for the following location. I have tentatiley decided upon where they are, but would like input from someone more knowledgeable than I. I hope this is not too much to ask.
The location where Custer decided NOT to send Herendeen down Tullocks Creek.
The location where Custer held his officers call vic the Busby Bend.
Location of the Crows Nest.
Location where Custer divided the command and dispatched Benteen on his flanking scout.
The location (knoll?) where Custer ordered Reno to attack.
Location of Ford A
Location where Benteen decided to return to the main trail.
Location Custer send Martini to recall Benteen.
Center of Mass of the skirmish line.
Location of the "timber" to which Reno withdrew.
Location of Ford D
(Is there a Ford C?)
Location where Keogh ordered Harrington to charge the Indians
I would prefer UTM grid coordinates but can translate Lat Long.
Kind regards
Mike
|
|
|
|
Post by noggy on Jan 25, 2021 14:47:14 GMT -6
I am specifically looking for grid coordinates for the following location. I have tentatiley decided upon where they are, but would like input from someone more knowledgeable than I. I hope this is not too much to ask. Location of Ford D (Is there a Ford C?)
The term "Ford C" exists, at least. I used to think it was used for the place Reno retreated but seen it used to describe a ford closer to Deep Ravine, so no idea what`s right. Here`s an old thread I haven`t read through, I must admit lbha.proboards.com/thread/3609Noggy |
|
|
|
Post by mikerobel on Jan 25, 2021 16:08:56 GMT -6
Thanks!
|
|
|
|
Post by herosrest on Jan 25, 2021 18:19:49 GMT -6
Gibbon's Ford Sioux Ford Bend's Ford 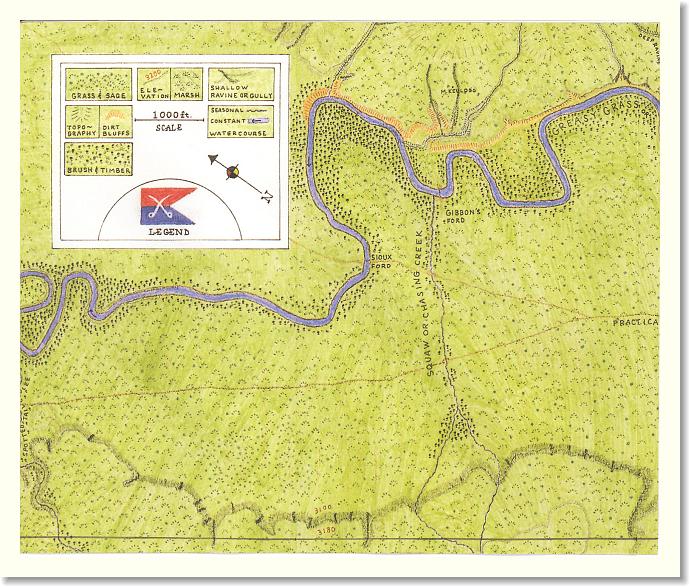   There are two Ford B's today. Ford B 1 or Maguire's 'B' and Ford B 2 or Realbird Ford. |
|
|
|
Post by mikerobel on Jan 25, 2021 20:18:11 GMT -6
herosrest: Thanks. I have several maps from books such as you reference above, but I am work from topographic maps and am looking for grid coordinates from those that have been on or near them to increase my accuracy of where I think they are. (I have five different scales, with coverage becoming more specific as you go from left to right: 1:500000 for the campaign view, showing all of MT, 1:250000, 1:100000, 1:24000 covering most of the approach after the divide, and 1:12500 just concentrating on the National Park area of the battle. When in the 11th Armored Cavalry Regiment, we would take photos of positions or where we would emplace obstacles and record the grid coordinate and azimuth of the center of the picture. When the photo was developed, we would mark the bottom center of the photo with an arrow and the grid coordinate and then write the azimuth we were looking along. Since I have not been there, I cannot use my nifty GPS-Camera device or my GPS to get the grids yet, so I want to have a grid so I can get to the right place (if not obvious by signage) and then record it for later reference. It's just a habit I have now, easier with digital technology and automatically embedded in an Iphone or my camera when you take a picture.
|
|
|
|
Post by mikerobel on Jan 25, 2021 21:53:06 GMT -6
| Who | Timeline | Location | Local Time | Clock Time | Event | | Custer | None | Vicinity Rosebud/Deafy Creek Junction
DD -107.008 45.549
MGRS - 13TCL432444585
| 241830JUN | 241957JUN | Send Herendeen to Scout Tullock's Creek
|
The first decision point appears to happen in between the Regiment departing the Muddy Creek Area and before reaching the Busby Creek/Rosbud river junction/Bend. There is no line of sight between the Regiments location that allows it to see into Tullock's Creek, but it is obvious the trail continues up the Rosebud. Notes: DD = Decimal Degrees MGRS = Military Grid Reference System. It is similar to the UTMS (Universal Trans Mercator System) Time = 24 June 1830 in the form of a military date time group. ***TEXT*** = Custer's Decision | Course of Action 1 | ***Course of Action 2*** | | Send Herendeen down Tullock's Creek | Do not Herendeen down Tullock's Creek | | Advantages | Advantages | | Complies with orders | | | Herendeen can report Trail is clear and of the column's progress. | Does not expose scouts to danger enroute. | | Probably does not expose scouts to danger enroute. | Retains Herendeens expertise with the column. | | May allow Terry to issue further instructions to Custer. | Does not impact troop strength for the mission. | | Does not impact troop strength for the mission. | |
|
| Disadvantages
| Disadvantages
| It can be seen the trail continues down the Rosebud.
| Does not comply with orders. | | Does not inform Terry valley is clear of Indians or the column's progress.
|
| May allow Terry to issue further instructions to Custer.
|
--It can be seen the trail continues along the Rosebud, even though we cannot see over the the divide seperating the Rosebud from the Big Horn river courses. --The order clearly states the CG wants to know that Tullock's Creek is free of Indians. Not sending the scout down prevents him from knowing this. --Neither course of action appears to place Herendeen in danger so if he conducts the reconnaissance, there is a high probability he will get through. This offsets that we may need his expertise as we continue the mission. --Terry may wish to change the plan if he knows the creek is clear, which could rob the 7th Cavalry of the glory. --Neither course of action affects the troop strength significantly as we continue to pursue the enemy. Recommendation
Send Herendeen up Tullock's Creek because it follows the CG's orders and fulfills one of his Critical Information Requirements. Feel free to justify your vote. Attachments:
|
|
|
|
Post by noggy on Jan 26, 2021 13:05:31 GMT -6
| Course of Action 1 | ***Course of Action 2*** | | Send Herendeen down Tullock's Creek | Do not Herendeen down Tullock's Creek | | Advantages | Advantages | | Complies with orders | | | Herendeen can report Trail is clear and of the column's progress. | Does not expose scouts to danger enroute. | | Probably does not expose scouts to danger enroute. | Retains Herendeens expertise with the column. | | May allow Terry to issue further instructions to Custer. | Does not impact troop strength for the mission. | | Does not impact troop strength for the mission. | |
|
| Disadvantages
| Disadvantages
| It can be seen the trail continues down the Rosebud.
| Does not comply with orders. | | Does not inform Terry valley is clear of Indians or the column's progress.
|
| May allow Terry to issue further instructions to Custer.
|
Great stuff. For me, CoA nr 1 is the choice. Agreed. The fact that it was an order weighs heavily; following them is kind of a big deal in any army. Especially when it is unclear when the two columns will be able to meet/communicate again, it seems like sticking to an agreed game plan is very important. Just like troopers, scouts didn`t enroll expecting to never risking danger. Finding the enemy is often dangerous, so risks is something both they and GAC would accept. Herendeen (or someone in his place) and some selected others could have gone to TC, while others (at least some Crows who knew the area) could have stayed with the main force. That would let GAC do as he was told, and still retain scouting capabilities of his own + knowledge of the area. Even if the scout to TC ended in a catastrophy. For probably the most of us, the priority would purely be mission success, not being the "main man". Well, who knows what one would have thought after 10 years with few or ne real opportunities to take a step up career-wise... Ofc it mattered a great deal to GAC, but the glory part is something I`d not put one ounce of thought in to, personally, sitting here in 2021. So that`s off the table. Basically I feel there aren`t too many reasons to seriously consider not scouting TC. One thing could be that spreading out increases the chances of being detected, but so did closing up on the Indians in general. Hardly any groundbreaking thoughts from me, but since I agree with you I reckon I`m safe  Looking forard to the next one. All the best, Noggy |
|
|
|
Post by mikerobel on Jan 26, 2021 17:31:09 GMT -6
Well, this is a pretty easy one. I thought hard about adding a 3rd COA which would have been to send a whole troop on the mission or at least a larger group of scouts. If the trail led that way, no way would I have only sent one guy.
|
|
|
|
Post by noggy on Jan 27, 2021 2:54:07 GMT -6
Well, this is a pretty easy one. I thought hard about adding a 3rd COA which would have been to send a whole troop on the mission or at least a larger group of scouts. If the trail led that way, no way would I have only sent one guy. I wouldn`t send 1 guy either, but scoutng TC with a small group and following the main trail with the column and some scouts would not be a problem. But as a CoA i think it might have bee a way too obvious pick. Looking forward to the next one, I imagine they will be getting harder. By a mile. Noggy |
|
|
|
Post by herosrest on Jan 27, 2021 5:08:15 GMT -6
Hi MR There is quite a bit of confusion over fords. Line of sight is everything with this battle's intricacies, and pretty much everything human - that's an interesting technique for visual record of observations which you use. What Terry knew, the intel available to him, would obviously influence thinking. Raynolds and Maynardier were over the routes in 1859, Connor led fighting expeditions in 1865 and that info was available to Terry as were the maps, which were updated in 1976 editions and issued. It helps understanding Terry's thinking, if we know what he knew and to that i'm trawling the reports which were available to him besides the maps which I have studied many times. Bit of a slog but enlightening. Lt. Maynardier reported travelling Tullock's Forks and the Rosebud during his 1859 expedition. Report on the exploration of the Yellowstone river by Bvt. Brig. Gen. W.F. Raynolds in 1859. The left branch travelled into the Rosebud valley along a lodge pole trail, obviously of interest to Terry and Custer, with good water and grass and a good road to its head offers view over the Tongue and its tributaries. Lovely. The creek mouths of Muddy and LameDeer around Jimtown; are the area to which Reno's scout advanced on the 16/17th June, with the hostile camp then at the mouth of the South Fork in Reno Ck. as the warriors rode out against Crook and the camps moved into Little Bighorn valley at Ford A and along to the mouth of Long Otter Creek towards the headwaters and Lodgegrass. They moved along the river to the battlefields on 23/24th June. Several here discussed Tulloch(k)s fingered forks a while back. A couple of those posting, AZRanger and Rosebud, know that ground. Bouyer knew the Sioux were towards LBH - he saw the trails. Corrected- Not Bouyer, the Rees with Reno's mission. |
|
|
|
Post by AZ Ranger on Jan 27, 2021 5:17:17 GMT -6
I agree that it was easy. I can't think of any condition in Tullock that you would not send Herendeen. It was not information for Custer's use. It was for Terry, who ordered it. That trail turns toward the LBH, which Terry predicted, and Herendeen had just been to that location two years earlier. He would have a value to Custer.
The worst-case scenario is that Tullock is full of Indians, and Terry would need that information.
Maybe what Herendeen knows is that at the divide, he could head up Tullock. From the 1874 rifle-pits, you can see where he could depart from.
Regards Steve
Off to Kanab, Utah, for some firearms training.
|
|
|
|
Post by herosrest on Jan 27, 2021 12:33:30 GMT -6
Muddy / LameDeer was a decision point and scouts were sent out. This is one of the matters of contention where record disagree somewhat but in terms of the instructions, the distances have some influence. 212-314 JunctionIt is give or take, 100 miles of march Mouth of Rosebud to Bighorn and mouth of the Little Bighorn. Montana Column. It is 65 miles, Rosebud to the Busby camp. Then At 14 miles along Rosebud is Kirby At 20 miles along Rosebud is Indian Ck. At 28 miles along Rosebud is Spring Ck. From any of the three is around 20 miles through Wolf Mountains to Lodgegrass on LBH valley. Another 4 miles along Rosebud puts 7th Cavalry on Crook's battleground for a total distance covered of 100 miles. Until the 23rd, the hostile camp was planning to move to Lodgegrass and would have been there on 25th/26th until the change of mind on 23/24th and move to the Custer Battleground. Gibbon had two companies of Cavalry scout along the Bighorn and across to Lodgegrass, Littlebighorn valley and Tulloch's Creek iback to the Yellowstone at the end of April, into May. They discovered a huge 'old campsite at Lodgegrass and I would assume, evidence of the fighting there in 1874. This had to factor into Terry's thinking. Distance, time, enemy movement in LBH valley. Terry's orders commited Gibbon and Montana Column to the mouth of the LBH on the 22nd. Lodgegrass is 30 miles along from the mouth of LBH. It wasn't fullproof, was it? |
|
|
|
Post by herosrest on Jan 27, 2021 13:36:30 GMT -6
Side note - I bumped into this  1. GIS, Mapping, and Spatial Analysis - Little Big Horn College 2. link = GIS, Mapping, and Spatial Analysis Specialization. University of Toronto 3. A little off-world, there is just incredible stuff underway with maths underlaying visual gaming. link - Checkout the Computer generated graphics. Hook that up to realworld GIS and you never have to leave home again. These days.... who wants to  This link streams better. |
|


 Looking forard to the next one.
