|
|
Markers
Jan 29, 2011 20:30:53 GMT -6
Post by bc on Jan 29, 2011 20:30:53 GMT -6
Yeah well, Doran's book is convoluted it takes someone better than me to sort it out. It just seems to me that if they found Harrington in 1877, more people would know about it.
bc
|
|
|
|
Markers
Jan 29, 2011 20:36:51 GMT -6
Post by AZ Ranger on Jan 29, 2011 20:36:51 GMT -6
bc without looking it up I believe the bullets were 405 gr and the bullets were found 3 different configurations.
so the id would be .45-55-405
Steve
|
|
|
|
Markers
Jan 29, 2011 21:30:02 GMT -6
Post by bc on Jan 29, 2011 21:30:02 GMT -6
bc without looking it up I believe the bullets were 405 gr and the bullets were found 3 different configurations. so the id would be .45-55-405 Steve You mention 3 different configurations. Guess my question was did they all use a 405 grain bullet or a different one in the carbine ammo. It just makes sense to me that if they dropped the powder grains down to 55 then they probably would drop the bullet weight as well to keep close to the same trajectory and range. bc |
|
|
|
Markers
Feb 1, 2011 16:01:23 GMT -6
Post by fred on Feb 1, 2011 16:01:23 GMT -6
Alright... this ought to begin driving some of us to distraction. This is preliminary, but so far, it works. Of course it takes a bit of mental acuity to visualize these areas and I will have to fine-tune things a lot more. Also, please note that this is only current marker placement and does not consider the original placements, movements of markers, or any comparisons with old photos. Gotta make that clear. This does, however, form a beginning... I think. Most of the data comes from Richard Fox, et al., Archaeological Perspectives, though some is from other sources as well. The analysis-- right or wrong-- is strictly mine and should be clearly noted within each entry. If not, let me know and I will make the corrections. I do not want this to appear to be the opinions of others who may not agree.
MARKER PLACEMENT
NOTE—Markers starred with an asterisk (*) were excavated by the Fox and Scott teams in 1984 – 1985. The survey map was oriented to due north and delineated by “north”—N64 – N81—and “east”—E20 – E30—grid squares (higher numbers being more north and more east).
Fox, Scott, and Connor list a total of 13 sets of paired markers. I have identified, as well, 23 additional pairs or groupings that could be paired markers. The remaining 7 pairs are located probably on Last Stand Hill or, less likely, in the grouping around the Myles Keogh marker. Last Stand Hill makes the most sense, however. If only 42 bodies were counted there initially and there are 52 markers, we have an overage of 10. The archaeologists identified two sets of paired markers, 67 – 68 and 86 – 87, leaving 8 possibles. The beta symbol—ß—marks possible paired markers.
1. Midway down the South Skirmish Line near Deep Ravine.
2. * South Skirmish Line near Deep Ravine: southeast side of Deep Ravine. An isolated marker. Single individual. Marker located within N72 – N73 and E22 – E23 grid square, approximately N7225 – E2215.
3. Lower South Skirmish Line.
4. Lower South Skirmish Line.
5. * Lowest marker on South Skirmish Line, paired with 6. Isolated; on the Deep Ravine trail directly above the ravine itself. Nothing found.
6. * Lowest marker on South Skirmish Line, paired with 5. Isolated; on the Deep Ravine trail directly above the ravine itself. Nothing found.
7. * Lower South Skirmish Line. Southern extent of the South Skirmish Line near the head of Deep Ravine and the end of the trail where it enters the ravine. Single individual.
8. Lower South Skirmish Line.
9. * Lower South Skirmish Line, paired with 10. Single individual on the South Skirmish Line.
10. * Lower South Skirmish Line, paired with 9.
11. Lower South Skirmish Line.
12. South Skirmish Line: grouped, 12 – 17. ß—possibly paired with 13.
13. South Skirmish Line: grouped, 12 – 17. ß—possibly paired with 12.
14. South Skirmish Line: grouped, 12 – 17.
15. South Skirmish Line: grouped, 12 – 17. ß—possibly paired with 16.
16. South Skirmish Line: grouped, 12 – 17. ß—possibly paired with 15.
17. * South Skirmish Line: grouped, 12 – 17; marked for Dr. Lord. Called lower South Skirmish Line.
18. South Skirmish Line.
19. South Skirmish Line.
20. South Skirmish Line, midway down.
21. South Skirmish Line, midway down.
22. South Skirmish Line, midway down.
23. South Skirmish Line, midway down.
24. South Skirmish Line, midway down, grouped, 24 – 27.
25. South Skirmish Line, midway down, grouped, 24 – 27.
26. South Skirmish Line, midway down, grouped, 24 – 27.
27. South Skirmish Line, midway down, grouped, 24 – 27.
28. Upper South Skirmish Line, alone on its southern side.
29. Above midway point of South Skirmish Line, grouped 29 – 32. ß—possibly paired with 32.
30. Above midway point of South Skirmish Line, grouped 29 – 32. ß—possibly paired with 31.
31. Above midway point of South Skirmish Line, grouped 29 – 32. ß—possibly paired with 30.
32. Above midway point of South Skirmish Line, grouped 29 – 32. ß—possibly paired with 29.
33. * Mid – to Upper South Skirmish Line, grouped 33 – 39; paired with 34. Marked for Mitch Boyer. On the trail near the middle of the South Skirmish Line.
34. * Mid – to Upper South Skirmish Line, grouped 33 – 39; paired with 33. Marker for Mitch Boyer. On the trail near the middle of the South Skirmish Line.
35. Mid – to Upper South Skirmish Line, grouped 33 – 39.
36. Mid – to Upper South Skirmish Line, grouped 33 – 39.
37. Mid – to Upper South Skirmish Line, grouped 33 – 39.
38. Mid – to Upper South Skirmish Line, grouped 33 – 39. ß—possibly paired with 39.
39. Mid – to Upper South Skirmish Line, grouped 33 – 39. ß—possibly paired with 38.
40. Cemetery Ravine, grouped with 41.
41. Cemetery Ravine, grouped with 40.
42. * Upper South Skirmish Line, grouped with 43. Single individual. ß—possibly paired with 43.
43. Upper South Skirmish Line, grouped with 42. ß—possibly paired with 42.
44. Upper South Skirmish Line.
45. Upper South Skirmish Line.
46. Upper South Skirmish Line, Cemetery Ravine side.
47. Upper South Skirmish Line, Cemetery Ravine side.
48. * Cemetery Ravine side of South Skirmish Line; marked for LT Sturgis.
49. Upper South Skirmish Line, north side; grouped 49 – 51.
50. Upper South Skirmish Line, north side; grouped 49 – 51. ß—possibly paired with 51.
51. Upper South Skirmish Line, north side; grouped 49 – 51. ß—possibly paired with 50.
52. * Upper Cemetery Ravine side of South Skirmish Line, paired with 53. Northern end of the South Skirmish Line, about 492 feet from the visitors’ center. Single individual.
53. * Upper Cemetery Ravine side of South Skirmish Line, paired with 52.
54. Upper Cemetery Ravine side of South Skirmish Line.
55. * Close to lower Last Stand Hill; grouped with 56. Possibly PVT Gustav Klein [F]. Too close to Custer/Last Stand Hill to be considered part of the SSL.
56. * Close to lower Last Stand Hill; grouped with 55. Possibly CPL William Teeman [F]. Too close to Custer/Last Stand Hill to be considered part of the SSL.
57. North side of Last Stand Hill; grouped with 58. Approximate location, N7740 – E2595. ß—possibly paired with 58.
58. North side of Last Stand Hill; grouped with 57. ß—possibly paired with 57.
59. Last Stand Hill. NOTE—Almost all the Last Stand Hill markers are located in grid square, N76 – N77 and E26 – E27.
60. Last Stand Hill.
61. Last Stand Hill.
62. Last Stand Hill.
63. * Last Stand Hill. Nothing found.
64. Last Stand Hill.
65. Last Stand Hill.
66. Last Stand Hill.
67. * Last Stand Hill; paired with 68. Near the fence enclosing the area. Single individual.
68. * Last Stand Hill; paired with 67. Near the fence enclosing the area.
69. Last Stand Hill.
70. Last Stand Hill; marker for Tom Custer.
71. Last Stand Hill.
72. Last Stand Hill.
73. Last Stand Hill.
74. Last Stand Hill.
75. Last Stand Hill.
76. Last Stand Hill.
77. Last Stand Hill.
78. * Last Stand Hill. Single individual.
79. Last Stand Hill.
80. Last Stand Hill.
81. Last Stand Hill.
82. Last Stand Hill; marked for Autie Reed.
83. Last Stand Hill; marked for Boston Custer.
84. Last Stand Hill.
85. Last Stand Hill.
86. * Last Stand Hill near bottom of fenced area; paired with 87. Single individual.
87. * Last Stand Hill near bottom of fenced area; paired with 86.
88. Last Stand Hill.
89. Last Stand Hill.
90. Last Stand Hill.
91. Last Stand Hill.
92. Last Stand Hill.
93. Last Stand Hill; marked for LT Harrington.
94. Last Stand Hill.
95. Last Stand Hill.
96. Last Stand Hill.
97. Last Stand Hill.
98. Last Stand Hill.
99. Last Stand Hill.
100. Last Stand Hill.
101. Last Stand Hill.
102. Last Stand Hill; marked for LT Cooke.
103. Last Stand Hill.
104. Last Stand Hill.
105. * Last Stand Hill; marked for LT Algernon Smith. Single individual.
106. Last Stand Hill.
107. Last Stand Hill.
108. Last Stand Hill; marked for CPT Yates.
109. Last Stand Hill; marked for George Custer.
110. Last Stand Hill; marked for LT Reily.
111. West side of Battle Ridge, closer to Last Stand Hill.
112. * West side of Battle Ridge, fairly close with 113 – 115; paired with marker 113. Isolated on the west side of the park road southeast of Last Stand Hill. Single individual.
113. * West side of Battle Ridge, fairly close with 113 – 115; paired with marker 112.
114. West side of Battle Ridge, fairly close with 113 – 115.
115. West side of Battle Ridge, fairly close with 113 – 115.
116. East side of Battle Ridge, northern end of Keogh Sector.
117. East side of Battle Ridge, northern end of Keogh Sector.
118. East side of Battle Ridge, northern end of Keogh Sector; grouped with marker 119. ß—possibly paired with 119.
119. East side of Battle Ridge, northern end of Keogh Sector; grouped with marker 118. ß—possibly paired with 118.
120. East side of Battle Ridge, northern end of Keogh Sector.
121. Calhoun Coulee.
122. West side of Calhoun Hill near upper Finley – Finckle Ridge; grouped with 123.
123. West side of Calhoun Hill near upper Finley – Finckle Ridge; grouped with 122.
124. Calhoun Coulee/Greasy Grass Ridge area.
125. Calhoun Coulee/Greasy Grass Ridge area.
126. Calhoun Coulee/Greasy Grass Ridge area.
127. Calhoun Coulee/Greasy Grass Ridge area.
128. * Isolated behind Greasy Grass Ridge, north of Finley – Finckle, south of 127. Single individual.
129. Finley – Finckle Ridge.
130. Finley – Finckle Ridge.
131. * Finley – Finckle Ridge. Calhoun Hill or Greasy Grass Ridge; nothing found but cobbles nearby.
132. Finley – Finckle Ridge.
133. Finley – Finckle Ridge.
134. * Finley – Finckle Ridge; paired with 135. Marked as Calhoun Hill. Single individual.
135. * Finley – Finckle Ridge; paired with 134. Marked as Calhoun Hill.
136. Finley – Finckle Ridge.
137. Finley – Finckle Ridge.
138. Finley – Finckle Ridge.
139. Finley – Finckle Ridge.
140. Finley – Finckle Ridge.
141. Finley – Finckle Ridge.
142. Finley – Finckle Ridge.
143. Upper Finley – Finckle Ridge.
144. Upper Finley – Finckle Ridge.
145. Upper Finley – Finckle Ridge; paired with 146.
146. Upper Finley – Finckle Ridge; paired with 145.
147. Upper Finley – Finckle Ridge.
148. * Calhoun Hill. Single individual. ß—possibly paired with 150.
149. Calhoun Hill.
150. Calhoun Hill. ß—possibly paired with 148.
151. Calhoun Hill.
152. * Calhoun Hill; paired with 155. Single individual.
153. * Calhoun Hill. Nothing found.
154. Calhoun Hill.
155. * Calhoun Hill; paired with 152.
156. Calhoun Hill.
157. Calhoun Hill.
158. Northern end of Calhoun Hill.
159. Northern end of Calhoun Hill.
160. Swale area between Calhoun Hill and Keogh Sector. Approximate location, N6865 – E2815.
161. Swale area between Calhoun Hill and Keogh Sector.
162. Swale area between Calhoun Hill and Keogh Sector.
163. Swale area between Calhoun Hill and Keogh Sector.
164. Swale area between Calhoun Hill and Keogh Sector. Approximate location, N6905 – E2805.
165. South end of Keogh Sector coming off Calhoun Hill.
166. South end of Keogh Sector coming off Calhoun Hill.
167. South end of Keogh Sector coming off Calhoun Hill. Approximate location, N6970 – E2800.
168. South end of Keogh Sector coming off Calhoun Hill, grouped 168 – 170. Approximate location, N6990 – E2800.
169. South end of Keogh Sector coming off Calhoun Hill, grouped 168 – 170. Approximate location, N6990 – E2800. ß—possibly paired with 170.
170. South end of Keogh Sector coming off Calhoun Hill, grouped 168 – 170. Approximate location, N6990 – E2800. ß—possibly paired with 169.
171. South end of Keogh Sector coming off Calhoun Hill.
172. East end of Myles Keogh grouping.
173. East end of Myles Keogh grouping.
174. * Eastern boundary fence in the Keogh Sector. No human remains, but evidence of a single individual based on identical carbine cartridge cases.
175. Myles Keogh grouping.
176. Myles Keogh grouping, grouped with 177.
177. Myles Keogh grouping, grouped with 176.
178. * Myles Keogh grouping; marked for CPT Keogh. Single individual.
179. Myles Keogh grouping.
180. Myles Keogh grouping.
181. * Myles Keogh grouping. Single individual.
182. No marker found.
183. Myles Keogh grouping. ß—possibly paired with 199.
184. Myles Keogh grouping.
185. Myles Keogh grouping.
186. Myles Keogh grouping.
187. Myles Keogh grouping.
188. A. Myles Keogh grouping.
B. Myles Keogh grouping.
189. Myles Keogh grouping.
190. Myles Keogh grouping.
191. Myles Keogh grouping.
192. Myles Keogh grouping.
193. Myles Keogh grouping.
194. * Myles Keogh grouping, paired with 195. Single individual.
195. * Myles Keogh grouping, paired with 194.
196. No marker found.
197. Myles Keogh grouping, northern side.
198. Myles Keogh grouping, northern side.
199. * Myles Keogh grouping. Photo comparisons show this could have been where the wooden marker for CPL John Wild was set. Based on the morphology, however, it appears only C Company’s PVT Willis Wright fits the criteria established by the analysis of bone fragments. Single individual. ß—possibly paired with 183.
200. * Keogh Sector. Single individual. It is possible that the bones found at this location were from the same individual at Markers 201 and 202. Located at N7126 – E2760.
201. * Keogh Sector, paired with 202. Single individual. It is possible that the bones found at this location were from the same individual at Marker 200.
202. * Keogh Sector, paired with 201. It is possible that the bones found at this location were from the same individual at Marker 200.
203. Keogh Sector, grouped with 204. ß—possibly paired with 204.
204. Keogh Sector, grouped with 203. ß—possibly paired with 203.
205. Keogh Sector, grouped with 206. ß—possibly paired with 206.
206. Keogh Sector, grouped with 205. ß—possibly paired with 205.
207. Keogh Sector.
208. Keogh Sector.
209. Keogh Sector.
210. No marker found.
211. Keogh Sector; grouped with 211A. ß—possibly paired with 211A.
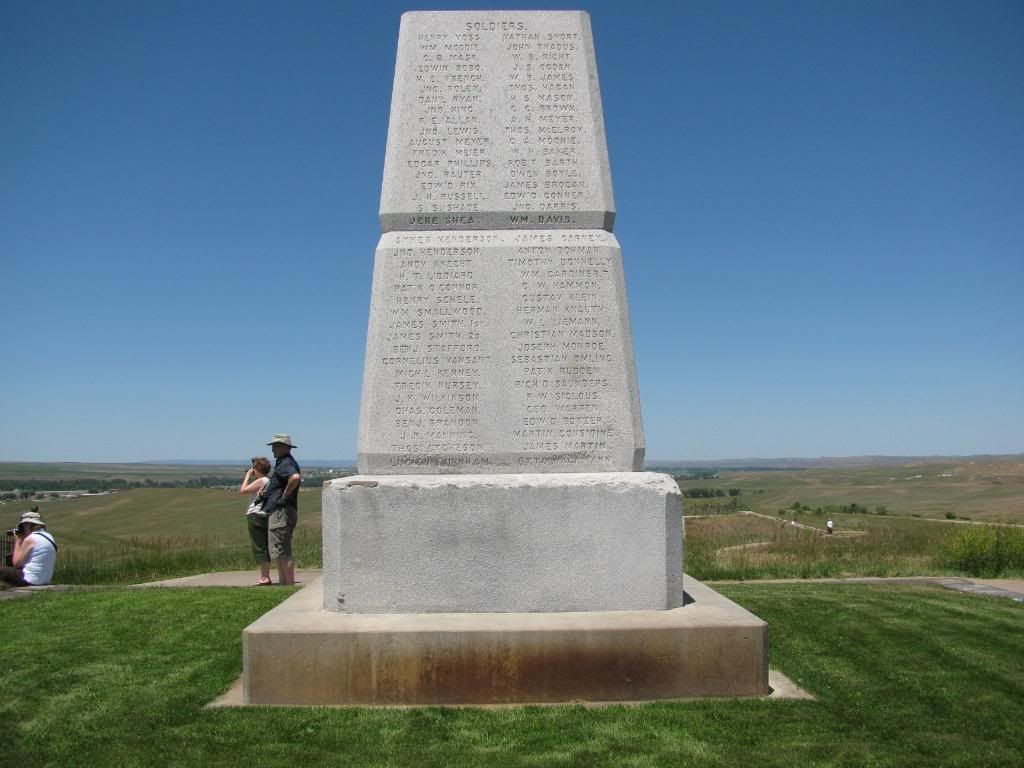
• 211A. Keogh Sector; grouped with 211. ß—possibly paired with 211.
212. Keogh Sector.
213. Keogh Sector.
214. Keogh Sector, grouped 214 – 216.
215. Keogh Sector, grouped 214 – 216.
216. Keogh Sector, grouped 214 – 216.
217. Eastern Keogh Sector, grouped with 218. ß—possibly paired with 218.
218. Eastern Keogh Sector, grouped with 217. ß—possibly paired with 217.
219. Keogh Sector.
220. Keogh Sector.
221. Keogh Sector, grouped 221 – 224.
222. Keogh Sector, grouped 221 – 224. ß—possibly paired with 223.
223. Keogh Sector, grouped 221 – 224. ß—possibly paired with 222.
224. Keogh Sector, grouped 221 – 224.
225. Keogh Sector.
226. Keogh Sector.
227. Keogh Sector, grouped with 228. ß—possibly paired with 228.
228. Keogh Sector, grouped with 227. ß—possibly paired with 227.
229. Keogh Sector.
230. Keogh Sector near 231.
• 230A. Keogh Sector in Myles Keogh grouping.
231. Keogh Sector, grouped 231 – 234.
232. Keogh Sector, grouped 231 – 234.
233. Keogh Sector, grouped 231 – 234. This marker seems incorrectly marked as there is another 233 on the south side of the South Skirmish Line near Deep Ravine. ß—possibly paired with 234.
234. Keogh Sector, grouped 231 – 234. ß—possibly paired with 233.
235. Northern Keogh Sector, paired with 236.
236. Northern Keogh Sector, paired with 235.
237. Northern Keogh Sector, grouped with 238. ß—possibly paired with 238.
238. Northern Keogh Sector, grouped with 237. ß—possibly paired with 237.
239. Northern Keogh Sector, grouped with 240. ß—possibly paired with 240.
240. Northern Keogh Sector, grouped with 239. ß—possibly paired with 239.
241. Northern Keogh Sector, grouped with 242. ß—possibly paired with 242.
242. Northern Keogh Sector, grouped with 241. ß—possibly paired with 241.
243. Northern Keogh Sector, grouped with 244. ß—possibly paired with 244.
244. Northern Keogh Sector, grouped with 243. ß—possibly paired with 243.
245. Northernmost Keogh Sector, grouped 245 – 247.
246. Northernmost Keogh Sector, grouped 245 – 247. ß—possibly paired with 247.
247. Northernmost Keogh Sector, grouped 245 – 247; marked for Mark Kellogg. ß—possibly paired with Marker 246.
248. No marker found.
249. No marker found.
250. No marker found.
251. No marker found.
252. No marker found. The archaeologists recorded this marker as isolated, at the top of a wash; nothing discovered. There is no record of it, however, on the survey map.
253. Calhoun Coulee, vicinity of Greasy Grass Ridge, south of 257, but generally north of the other Calhoun Coulee markers and closer to Deep Ravine.
254. Calhoun Coulee, vicinity of Greasy Grass Ridge, south of 257, but generally north of the other Calhoun Coulee markers and closer to Deep Ravine.
255. South side of South Skirmish Line near Deep Ravine headwall, but below 233.
256. No marker found.
257. South of Deep Ravine near Greasy Grass Ridge. Isolated, between Deep Ravine and Greasy Grass Ridge. Single individual. The Walter Camp interviews maintained that CPL John Briody (F) had been found at this site with one leg cut off and placed under his head by the Indians. The placement of the discovered bones would be consistent with such an event.
NOTE—A total of nine markers are missing: 182, 196, 210, 248 – 252, inclusive; and 256. There is one duplicate (233) and three “add-ons”: 188B, 211A, and 230A. This still leaves a total of 252 markers.
Summary Analysis of Marker Placement
Assuming Godfrey was correct in claiming there were 42 bodies on Custer/Last Stand Hill, the maker placements should appear as follows (in order of perceived activity):
NOTE—Numbers in brackets indicate elimination of paired markers and locations where no remnants or artifacts were found. Of necessity the bracketed numbers equal 210.
1. Calhoun Coulee: 9 [9]
2. Finley – Finckle Ridge: 19 [17]
3. Calhoun Hill: 14 [11]
4. Swale area: 5 [5]
5. Keogh Sector: 89 [81]
6. West Battle Ridge: 5 [4]
7. Custer/Last Stand Hill: 56 [42]
8. South Skirmish Line: 49 [36]
9. Cemetery Ravine: 6 [5]
10. Markers where nothing was found: 5 and 6 (paired); 63; 131; 153; 252 (no marker mapped on the survey).
More to follow... eventually.
Best wishes,
Fred.
|
|
|
|
Markers
Feb 1, 2011 17:19:57 GMT -6
Post by Dark Cloud on Feb 1, 2011 17:19:57 GMT -6
Before we go any further, who first attached a numeric to each stone, and are they consistently used by Park Service and everyone? Is there a map of them? Is this in Fox, which of course I don't think I have anymore?
|
|
|
|
Markers
Feb 1, 2011 19:10:05 GMT -6
Post by fred on Feb 1, 2011 19:10:05 GMT -6
Before we go any further, who first attached a numeric to each stone, and are they consistently used by Park Service and everyone? The stones are numbered on their reverse side, so it appears this was done when they were made. I do not know how many of the original markers remain... many have been replaced. I would suspect certainly that this numbering system was in place from the very beginning. All the markers are referred to by these numbers. A perfect example is Marker 174, isolated on the eastern boundary fence. It is known simply as "174," not by Bailey's name. There is an eye-breaker in the original Scott/Fox book, Archaeological Insights, not Perspectives. That book is small, thin, orange-red cover, and still available, though you have to be careful the map is included. It is a large fold-out housed in a pocket on the inside back cover, and unless you are used to maps, tough to read, for there are no grid lines or contour features, only grid references. It is also missing Marker 252. Best wishes, Fred. |
|
|
|
Markers
Feb 1, 2011 19:39:19 GMT -6
Post by Dark Cloud on Feb 1, 2011 19:39:19 GMT -6
Did Sweet record the numbers on a map? I guess I should have known this, but I don't.
If the numbers on the generic 'soldier fell here' markers were just to keep count, it's odd that the ones with names aren't the first numbers. By what method was it decided that, say Custer was to be 109? Further, he was a wooden cross at first, was that marked? TWC is 70 and GAC, buried in the same grave - originally, supposedly - is 109. ?
When the vanadalized stones were replaced, did they have the same numbers? Would that explain two numbered the same if they wrote down the wrong damaged number?
I may be shorting out, but this strikes me as odd, and betraying a plan of which we're not yet aware, or I'm not anyway. It would seem that there had to be a map, with the numbers accorded, before names were put on some of them. What am I missing here?
It's going to be 20 below tonight in Boulder, was near it last night, which means in five days we've had a 90 degree variation. This keeps us alert. Ya know? And talkative.
Yup, yup, yup, yup it's TOO FRIGGIN' COLD. More coffee should calm me down as I wait for the traditional sound of shattering pipes, windows, tempers.
Yupyupyupyup.......
|
|
|
|
Markers
Feb 1, 2011 20:20:54 GMT -6
Post by fred on Feb 1, 2011 20:20:54 GMT -6
Darkcloud,
Apparently, Sweet believed he was placing the markers at the actual sites of the original burials. That is good news because it lends credibility to the original placement. According to the Pohanka/Brust/Barnard book, Where Custer Fell, Sweet made a determined effort to locate body parts, i. e., bones, and a further effort to place the markers at the head, rather than at the feet of the remains. That shows that when the re-interment took place, enough bones were missed to be able to allow Sweet to make a reasonably accurate placement of many of the stones.
Also, it appears that as many as 259 markers have been placed at one time or another, though the Fox/Scott map makes no reference to those extras and indeed, a number-- as you can see-- of the 257 are missing.
Oddly enough, it appears Sweet-- like Reno and Benteen before him at the LBH-- was given a rather impossible task, the errors compounded a year later by a USGS topographer named Marshall who was sent there to map the markers, then proceeded to miss several and well as mis-mark many more. Nice!
If you notice the notes in both posts, the Scott/Fox team identified 252 markers in the 1984 - 1985 survey. When you add in the extras, then deduct the missing, you arrive at the same number of 252. The only real discrepancy is the actual Marker # 252 and the notes that accompany it. I suspect that may have been a typo and the commentary belongs elsewhere. There was no Marker 252 on the survey map.
Best wishes,
Fred.
|
|
|
|
Markers
Feb 1, 2011 20:42:33 GMT -6
Post by fred on Feb 1, 2011 20:42:33 GMT -6
Oops! I only saw your first line; you must have added the edit while I was working on the above post.
Can't say for the names, but I doubt seriously any of those are original. According to a scout named Campbell, LT Roe marked the original burial sites with a wooden stake in 1881. That might lend additional credibility to Sweet's placements nine years later. The only way Sweet could have known about placing markers with names would have been if Roe or Sheridan had mapped the area and recorded where certain "personalities" fell. I doubt that happened, so I believe the names were added much later. I'll have to leaf through the Barnard book looking for the earliest photos of Custer's marker. That should tell us something.
Not nearly that cold here, though we have had plenty of sleet and freezing rain today, marked by a fairly long hiatus of nothing but ugly clouds. The worst is supposed to hit tonight and all day tomorrow. Ice accumulations rather than snow. I have never seen a winter like this in lower New York, even when I was a kid.
Temperatures have been cold as well, but again, nothing like what you get there. Tomorrow night we are supposed to go as low as 9 and I have seen it lower than that during one day in January. My cardiologist would have a stroke were he to see me wielding the snow shovel like I was a professional ditch-digger, but I no longer lift; I merely push. Besides... who the hell wants to live forever... though I must say, since I stopped looking at the other boards and reading Conz and that idiot "airborne"-- the latest sheep with a nose ring-- my blood pressure has subsided. That's the good news. The bad news is now you are stuck with me. Get used to it.
And how the hell can you drink coffee this late at night? I stop at 3 PM and am down to about four cups a day... from about 20. Plus, I don't handle that Starbuck's burnt glue very well. On the other hand, finding a decent varietal is tough. The blends here are lousy, my wife hates flavored... oh, life! Its slings and arrows....
Best wishes,
Fred.
|
|
|
|
Markers
Feb 1, 2011 21:14:23 GMT -6
Post by Dark Cloud on Feb 1, 2011 21:14:23 GMT -6
But:
The numbers were put on the back at manufacture. Fine. What would be scenario where numbers 109 and 70 and others were selected to bear names? This suggests there was an organization unremarked upon, and whoever did or redid the stakes had a map or just divided it into sections which were attached to the numbers. Something. I must be missing something, because it strikes me as important to the issue but nobody else thinks so.
The empty spaces in the current fenced area are odd.
|
|
|
|
Markers
Feb 1, 2011 22:01:28 GMT -6
Post by sfchemist on Feb 1, 2011 22:01:28 GMT -6
Fred/darkcloud
I'm not trying to be a wise-ass or throw another wrinkle into the marker discussion but just wanted to run something by you guys:
If there are markers, numbered 1 thru 7 how many total markers are there? Easy, the answer is 7: but how is this number mathematically calculated ? 7-1 +1 = 7. Now before you think I'm crazy, hear me out:
Let's say one has markers numbered 70 through 80...now how many total markers are there? The answer is NOT 10. There are 80-70 + 1 markers or 11 total.
Again, I'm not trying to be a wise-ass here but if you come up short one marker somewhere along the line it may be a simple math error made by someone over 100 years ago. I know this is simple stuff but I can easily see a Private getting a little confused over something like this and end up with an extra marker....so what would he do with it? Just a thought that has been running through my mind.
Cold, you guys don't know cold.<g> Last night we had a wind chill of -35 degrees. Right now the temperature is -15 but with zero wind so we are in the middle of a warming trend.
Wayne
|
|
|
|
Markers
Feb 1, 2011 23:36:10 GMT -6
Post by bc on Feb 1, 2011 23:36:10 GMT -6
2 or 3 things.
They have been recently replacing certain markers. I wonder how they are numbering those and if they pick a certain number to replace.
Who did the original marker numbers and then who did the ones for the officers? I wonder if the original grave marker company did the basic stone with numbers and then someone locally did the officers' markers.
To get GAC at #109 and TWC at #70, I suspect there must have been some kind of list in maybe company order or something along that line. It appears they just rode along with wagons and kicked off markers as they went along the lines. GAC's body was removed. He was probably given a left over marker after everyone else on LSH got theirs. Especially if Reilly's body was also removed. After #110 the wagons move away from LSH. Were any other bodies removed prior to marker placement? I know TWC ended up at Leavenworth but not sure when.
Wonder what McIntosh's number as well as Hodgson's since they were the officers with Reno. They aren't on your list. Same for the others on Reno Hill.
If #252 was at the head of some obscure wash, it is either laying over and covered up with dirt or else sitting in someone's basement as a souvenir. No you can't have it back. Where is Butler's and Foley's markers in this bunch?
bc
|
|
|
|
Post by fred on Feb 2, 2011 9:29:06 GMT -6
What would be scenario where numbers 109 and 70 and others were selected to bear names? I think your organized mind is trying to make reason out of a somewhat chaotic situation. It is sort of like the issue of "time" during the 25th. No one really cared because it did not bear on the actual events; it is us who make the issue of it. I agree... and I believe you are missing nothing. Number assignment was random; it had to be, otherwise GAC's would have been marked as # 1 or something special. That implies a sectoring of the battlefield, maybe even an informal mapping, though I doubt that. Terry, Gibbon, Reno, and Benteen did precisely that when they broke the burial parties into various groups and to me it is just common sense, especially since no one was a cartographer, other than Maguire and I am sure he was busy doing other things. I do not find them so; to me, it merely points to the ebb and flow of the battle and the various segmenting of the fighting because of the way the units were situated. Of Keogh's entire 3-company battalion-- what, some 132 men or so-- a mere 20 or fewer made it to LSH. Indians were too consumed with the blood-lust at hand, and with the smoke, dust, and confusion, it is reasonable to assume a few harried troops got past the majority of warriors, only to be confronted by more farther north. That explains gaps in the battle flow and I think it is a very reasonable assumption. And Darkcloud, don't complicate things. I think you are giving these guys too much credit. I agree with BC... they drove the wagons past whatever stakes were left and merely dumped off the markers. Few cared; it was a job. Owen Sweet was conscientious and tried to ensure he set them correctly. One wonders, however, if he was given orders to place all the markers or whether he "paired" them because of scattered bone fragments. Quite honestly, I think the field is fairly accurate with the exception of the paired markers. What I would like to see is the same survey map, minus the spurious markers. That would make it a lot easier to compare to whatever photos there are. I also wonder if Sandy Barnard and crew used every old photo of the markers in their book.... Best wishes, Fred. |
|
|
|
Post by benteen on Feb 2, 2011 9:35:17 GMT -6
Gentlemen,
To me it is amazing that they got as much right as they did. Last month there was an expose on Arlington National Cemetery where they discovered that at least a dozen markers were over the wrong graveside. They fear there may be over a hundred more misplaced gravestones.
these errors were committed by a superintendent with a staff,computers, and all modern technology. I can only imagine the task that Sweet and others had with only a pencil and paper and some wooden stakes
And Capt, what are you doing with a shovel, that's what wives are for <G>
Be Well
Dan
|
|
|
|
Post by fred on Feb 2, 2011 9:35:49 GMT -6
Diane,
You can tell these clowns at Pro-Boards-- if you want to-- that when I hit the "post" button for Reply No. 27, there was the usual delay, then the flag that it took too long. I knew what would happen next... I hit the "back" button, my typing showed up on the white screen, I hit "post" again, then scrolled down the thread. There was my reply, in duplicate. I deleted the second one, then checked the "30 most recent posts" and # 27 was not there... nor, obviously, was the one I deleted.
And they think it's someone else's problem...?
Best wishes,
Fred.
|
|