|
|
Post by tubman13 on Feb 26, 2015 7:56:07 GMT -6
Good stuff, thanks. Do you plan to float the whole battlefield(would be my choice)or just segments?
Regards,
Tom
|
|
|
|
Post by AZ Ranger on Feb 26, 2015 9:10:23 GMT -6
I think launch at Realbirds and pay them for access and get picked up after the Ford Ds.
It would be nice to start at 7th Ranch but not how much beer that would take.
Steve
|
|
|
|
Post by tubman13 on Feb 26, 2015 9:27:31 GMT -6
That's right, no C- store in middle! However if I start out without any I could finish that way. I like the pickup idea saves on leaving trucks at both ends. Maybe we could pay the Fred or the Realbirds to deliver a 12 pack at MTC!
Regards,
Tom
|
|
|
|
Post by AZ Ranger on Feb 26, 2015 10:30:40 GMT -6
Great idea
|
|
shaw
Full Member

Posts: 187
|
Post by shaw on Feb 26, 2015 14:08:13 GMT -6
I'm glad that my first trip was in early November 1970. Few people or rangers about. While I stayed near the road for the most part I was able to go to some areas that are less accessible these days. Of course we know more now thanks to the archaeology surveys. I didn't have that information. I lucked out because of the local Crows being their on a field visit. Befriending one older Crow gentleman (he said he was 70) made all the difference. The big shock back then was that perhaps Custer was shot crossing a ford. Still don't have any proof that that was the case.
Anyway, 44 plus years ago..
|
|
|
|
Post by tubman13 on Feb 26, 2015 14:16:14 GMT -6
Custer shot crossing the ford, which ford? There is at least one poster who likes this!
Regards,
Tom
|
|
|
|
Post by mac on Feb 26, 2015 15:22:14 GMT -6
I doubt that Custer would have attempted to even get that close to Ford D at that stage. He was looking not attacking in my view. However I could see that if his cover was blown that there were enough warriors there to persue him away up to Cemmetery. I think his attack at D was going to come when Keogh joined him and all the better if Benteen had made it by then.
Cheers
|
|
|
|
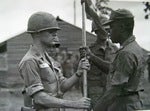
Post by herosrest on Mar 8, 2015 18:03:27 GMT -6
Ask, bc, and ye shall receive! After leaving the Keogh battalion, Custer and Yates moved further north, probably below the military crest of Battle Ridge. Mitch Boyer knew the country and if Custer was to put a halt to the fleeing of Indian families he would need to cross the Little Big Horn somewhere north of where the families were headed or were congregating. This would be known as Ford D.  [This picture was taken from the northern-most side of Last Stand/Custer Hill. There is a good possibility the Custer/Yates column moved along the ravine on the right side of the photo toward a crossing somewhere off in the distance. Unfortunately, whatever crossing was there is obscured today by buildings, Interstate, service roads, ramps, railroad tracks, and constant flooding.] [This picture was taken from the northern-most side of Last Stand/Custer Hill. There is a good possibility the Custer/Yates column moved along the ravine on the right side of the photo toward a crossing somewhere off in the distance. Unfortunately, whatever crossing was there is obscured today by buildings, Interstate, service roads, ramps, railroad tracks, and constant flooding.]Best wishes, Fred. Bouyer had been shot in the back during the fighting at Ford B and C. We know this from many interviews of Curley. books.google.co.uk/books?id=otizBgAAQBAJ&pg=PA374&lpg=PA374&dq=mike+donahue+ford+d&source=bl&ots=jamMTmUiZg&sig=KAAbUc2UI8VQkJOKf9bIxqjhmPU&hl=en&sa=X&ei=XN78VPPIGcjX7QaRtIH4Ag&ved=0CDkQ6AEwBTgK#v=onepage&q=mike%20donahue%20ford%20d&f=falseIf we dive now into note 43 on the linked page of Fox's notes, it is errant that the well used trail led to Ford D. In fact this is a misleading falsehood, because the well used trail led from and to the mouth of Deep Coulee from and to Calhoun Hill. It is visible plainly in this image.....  This trail is followed exactly today by the................ battlefield road. Isn't it amazing how dumb the experts really are. Of couse they are not dumb, just selling........ choose your own expletive. Clark's map relates Calhoun Hill as H - where Custer fell and the movement sindicated on the map are completely understood and established as occuring during the fighting and retreat from Ford B. |
|
|
|
Post by herosrest on Mar 8, 2015 18:10:26 GMT -6
Note 37 - Photographs of the bluffs and mouth of Deep Ravine were taken by Stanley Morrow as the cliffs over which troopers fell or were thrown to their deaths, indicating corpses below and problems reaching the river. Back to the drawing board Mr Donahue. Morrow photographed the bluffs, from the bluffs.
The question is how cavalry mounts made that journey in stampede as indicated by Two Moon on his map.
|
|
|
|
Post by herosrest on Mar 8, 2015 18:18:52 GMT -6
Deep Coulee and the trail towards.......... everywhere. That shown on Lt. Clark's map and used as the battlefield road today. The natural route of travel. Attachments:
|
|
|
|
Post by AZ Ranger on Mar 12, 2015 8:48:30 GMT -6
I think madman across the water is accurate
Hope your printer is fixed soon
AZ Ranger
|
|
|
|
Post by herosrest on Mar 12, 2015 18:40:06 GMT -6
I think madman across the water is accurate Hope your printer is fixed soon AZ Ranger There are some deals around, pay monthly for your ink. Enjoy yourself, keep yer eyes open. You never know what might be unearthed by a hoof or water rat. The Cheyenne circle of lodges was in the form of a cresent with the horns or open mouth facing east towards the sun, I guess. Looking straight across the river towards MTC, Deep Coulee and their divide. There sat Roan Bear, outside the Holy tepee watching what was going on. Its heads or tails for the nut job, depending on your bent Custer or Sitting Bull, staring at each other across the stream.  Hoka hey! |
|
|
|
Post by herosrest on Mar 12, 2015 18:56:24 GMT -6
|
|
|
|
Post by herosrest on Mar 12, 2015 20:37:08 GMT -6
An early investment of the recent Strategy of Defeat, battle assessment at 18, The Graveyard Watch.
Quote 'Custer's move back from Ford D had to be rapid indeed - probably 12 miles per hour or faster. There was no time to waste: things were becoming critical and these Indians were in no mood for bargaining. Besides, it was now pushing four o'clock - 3:46 (just about the time Harrington, more than a mile and one half away was ordering his command to dismount in Calhoun Coulee) - and Benteen should be approaching the higher ground where he would spot Keogh's troops. Custer had seen all he needed to see; Knew the full extent of the village, the full extent of the Indian's retreat; and had found a suitable ford.'
It had long been serious opinion prior to John Stands in Timber's information concerning the battle, that a northern foray by Custer was fiction. Timber and Rickey, Scott and Bleed and Donahue in particular feel this not to be so and have worked hard to alter perceptions with what is entirely trivial data, and with input by Richard A. Fox which is beyond unreliable.
Firstly, map evidence provided by Timber was developed from work by Kuhlman. Similarities in detail are more than remarkable. Timber encompassed Kuhlman's work into his own. Kulhman's scenario and evidence for the Custer fight were futile in furthering Marquis's enhancements and adaptions of Cheyenne testimony which are utterly flawed beyond any reason or reasonableness by belief in an orderly, unhurried and gradual decent into stupidity by perfectly arrayed fighting lines under complete control. It didn't happen ad Timber adopted the thinking and theory. For Timber, read Kuhlman.
In regards Strategy of Defeat, The Cheyenne village was observed by Custer as soon as he arrived into MTC and saw it opposite. That was the extent of the encampments reach downriver. Fact, the way of it, end of the story of the four or three mile long encampment. Custer did not ride to a northern ford as given, to ascertain the extent of the village or to locate a flight from the village which had earlier obtained their ponies from herds there and returned up the valley to confront cavalry with Reno and Custer, whilst there families fled west onto bluffs on the opposite side of the valley from the soldiers.
One example of concoction into participant record is the Lazy White Bull sketch map made by Walter Campbell to show women and children running back along the valley. White Bull was being shot as he rode in from Weir's Peaks and knew nothing first hand of anything to do with movements by women and children two miles down river below the bluffs and ridges ahead of him. At no relevant time, did he view events in the valley as reported.
The major sinker of Timber's interpretation of the battle is the proud tradition of the Suicide attackers and particularly Lame White Man and Noisy Walking. Cheyenne testimony places them in the attack made by Yellow Nose, which moved over the west flank of Deep Coulee after retreating cavalry. During that attack inn pursuit of retreating soldiers, both Noisy Walking and Lame White Man were mortally wounded. Where they fell is marked, regardless of opinion about location of the markers. That attack by suicide boys was from Deep Coulee onto Battle Ridge where the two Cheyennes were killed. This was during a movement onto Battle Ridge from the river and west flank of Deep Coulee. There is no doubt about this. There is very much more but this will do for now.
|
|
|
|
Post by herosrest on Mar 15, 2015 10:58:57 GMT -6
Link to some of Kuhlman's data showing thinking, information gleaned from informants and the wide left hook performed by hostiles to encircle the neatly arrayed and waiting command deployed with two companies online and three in reserve. Dismounted according to Two moons record. It is interesting that Kuhlman indicates the NC Ridge locale skirmish, given occuring within minutes of the Reno Benteen union. The skirmish location relied either upon cartridge finds or Cheyenne informants or both. The skirmish location is one of those later given by John Stands in Timber in his research maps. mtmemory.org/cdm/fullbrowser/collection/p15018coll5/id/9/rv/singleitem/rec/66 |
|


 Hoka hey!